How to create a scheduled report on FTDs?
If you want regular updates on new FTDs via Telegram, setting up a scheduled report is one of the best options.
Setting-up the report
So, let us describe the report setting up procedure step by step.
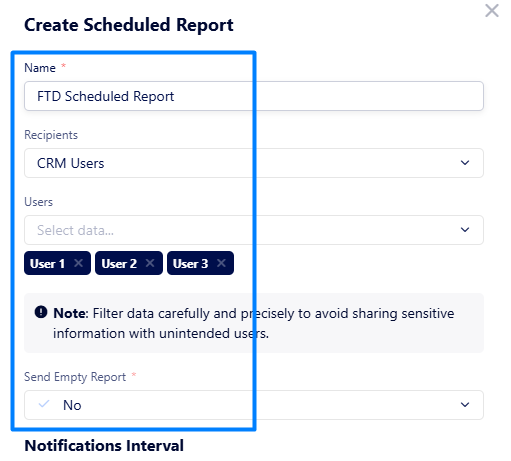
Go to Reports → Scheduled Reports and click + next to the page title.
In the appeared window, specify the following:
Name – enter a unique report name.
Recipients – define type of users which the report will be sent to.
CRM Users – select if you want to send the report via Telegram to Lead Distribution users.
Non-CRM Users – select if you want to send the report via Telegram to recipients outside Lead Distribution.
Send Empty Report – define if you want to receive an empty report or not (if there is no data for a specific period of time, a blank report marked "Empty" will be sent).
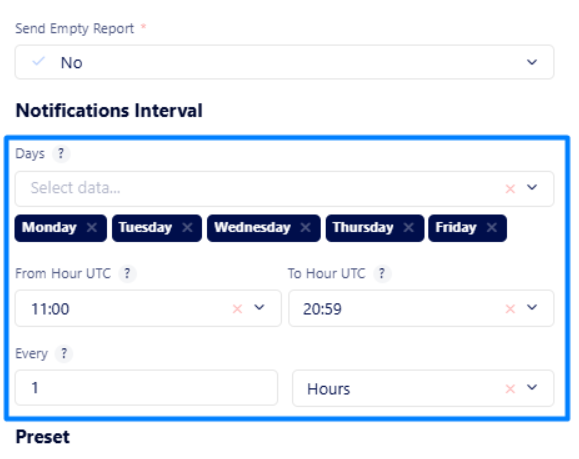
Notifications Interval (optional) – in this block, you need to specify when and how often you want to receive the report.
Days – select day(s) of the week when you want to receive the report.
From Hour UTC / To Hour UTC – select specific hour(s) of the day (in UTC format) when you want the report to be sent.
Every – define how often the report to be sent during the selected period.
The example above says that you will receive the report every hour from 11:00 UTC to 20:59 UTC from Monday to Friday.
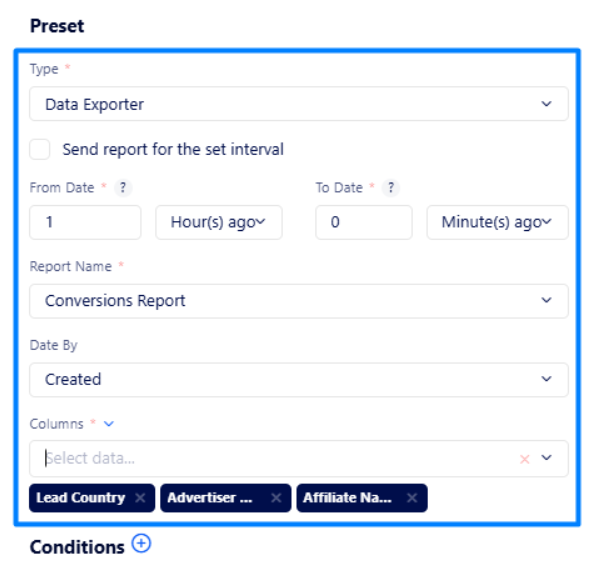
Preset – here, you need to customize the report data.
Type – select the “Data Exporter” option.
Next, specify the time period for which the FTDs data should be included in the report:
Check “Send report for the set interval” if you need to monitor the FTDs only occurring during the period you set in the “Notifications Interval” section above.
Select a specific time range with From Date / To Date, if you need to monitor data for a certain period of time (e.g., if you need to study FTDs for the last 30 minutes up to now).
Report Name – select the “Conversions Report” option.
Date By – select the “Created” option.
Columns – select data columns to be included in the report. Here, we recommend you to select Lead Country, Advertiser, and Affiliate.
Note: To avoid data repetition in future reports and get notified on new FTDs only, ensure the "Every" interval matches "From/To Dates".
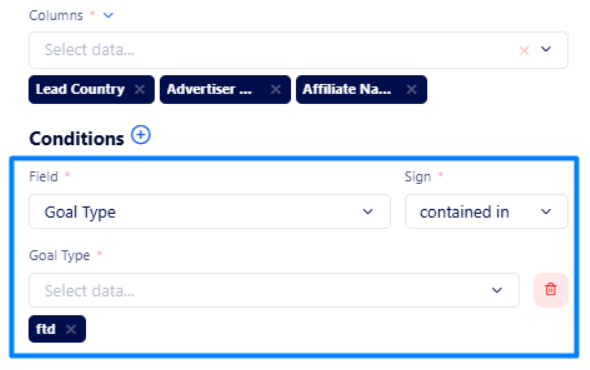
Conditions – select the required conditions to view only relevant information and filter out unnecessary details.
Here, choose “FTD” as “Goal Type” as it is displayed in the screenshot below:
Thus, according to the configuration above, you will receive your first FTD report at 11:00 UTC for the period 10:00-11:00 UTC of the same weekday (if any FTD occurred for that time).
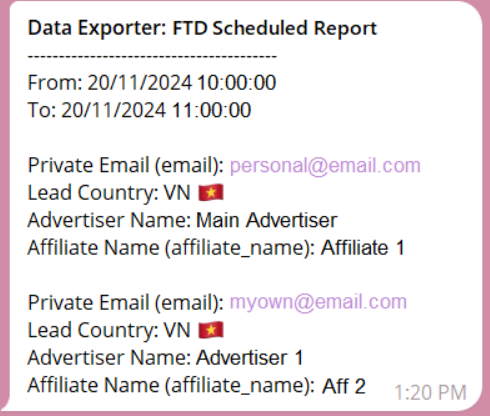
The report will look as follows:
Notifications Interval vs Preset timerange
You may notice that time ranges need to be specified in two different sections. While they may seem similar, there is a key difference between them.
Let us explain the difference with the example below:
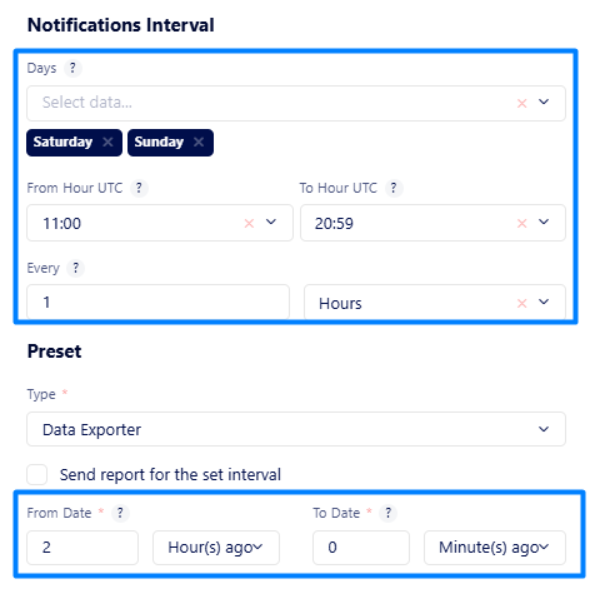
The screenshot shows that you will receive hour-based reports only on Saturdays and Sundays, between 11:00 UTC and 20:59 UTC.
The first report will be received on Saturday at 11:00 UTC with the data for the period 09:00 UTC until 11:00 UTC.
The second report will be received on Saturday at 12:00 UTC with the data for the period 10:00 UTC until 12:00 UTC.
Last Saturday’s report will be received at 20:59 UTC with the data for the period from 19:00 UTC until 20:59 UTC on Saturday.
Note: The “Every” field specifies how often you want to receive the report, while the “From/To Dates” define the time period for which the data will be included in the report.


