
How to customize a cap?
This article aims to describe the procedure of customizating the pushed and rejected lead capacity of an advertiser..
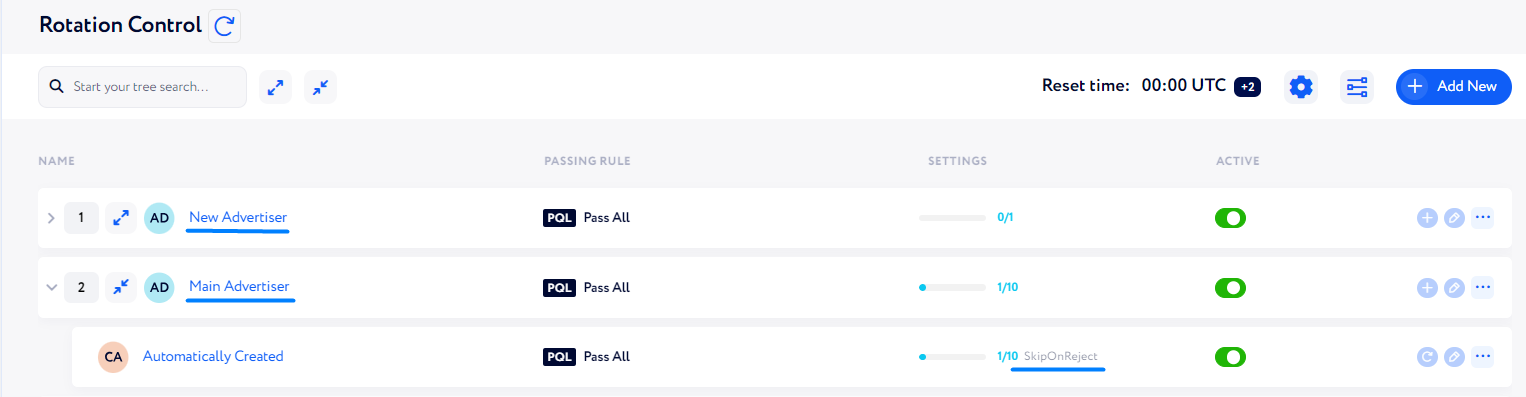
Cap – number of leads an advertiser can receive/reject per day. This section is automatically created once you have add a new element to Rotation Control.

Let us describe how to configure it step by step.
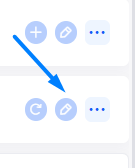
Open the settings window by clicking the button highlighted in the screenshot below:
In the appeared window, fill in the following:
Name – enter your own cap name or leave the default one.
Lead Behavior Pattern – define a lead behavior if it fails to be pushed to a target advertiser (for any reason):
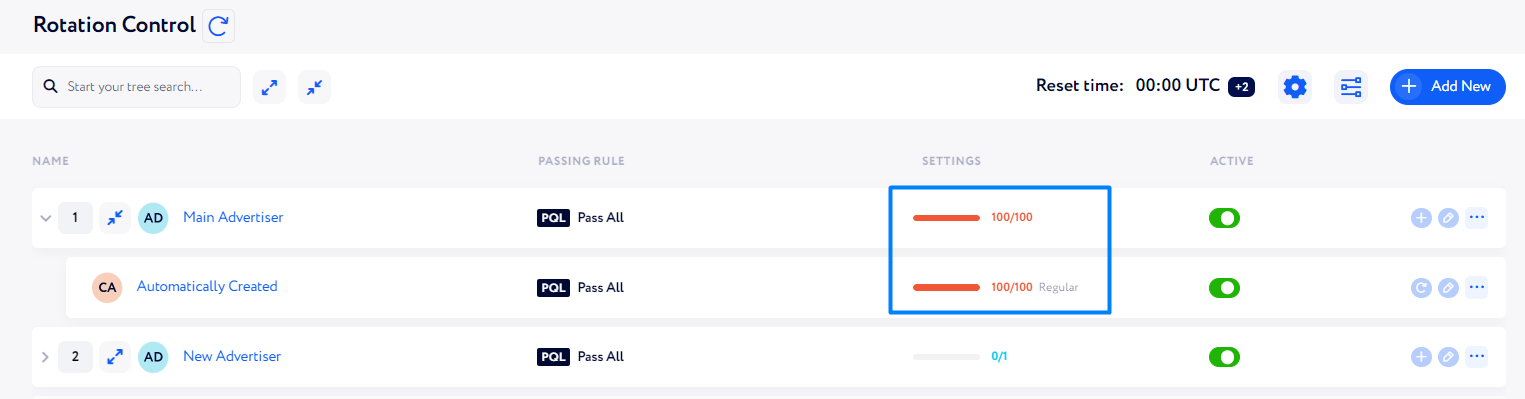
Regular – if the given advertiser's pushed lead capacity is full, so a lead is not allowed to push there, it skips the advertiser and tries to be pushed to the next matching advertiser down on the page.
For example, if a lead is trying to be pushed to the Main Advertiser (see the screenshot below), but as its pushed lead capacity is full, the lead will not be pushed to the advertiser, but will continue trying to be pushed to another suitable advertiser down on the page.
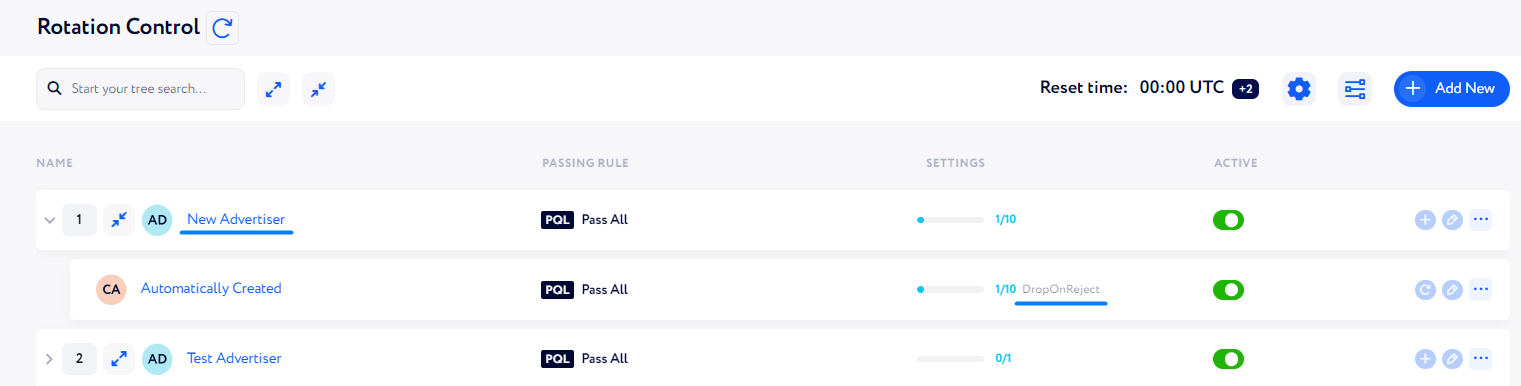
Drop On Reject – if a lead is rejected by the advertiser, it will not try to be pushed to the advertisers down on the page.
For example, if the New Advertiser rejects a lead, such a lead will not try to be pushed to any other advertiser.
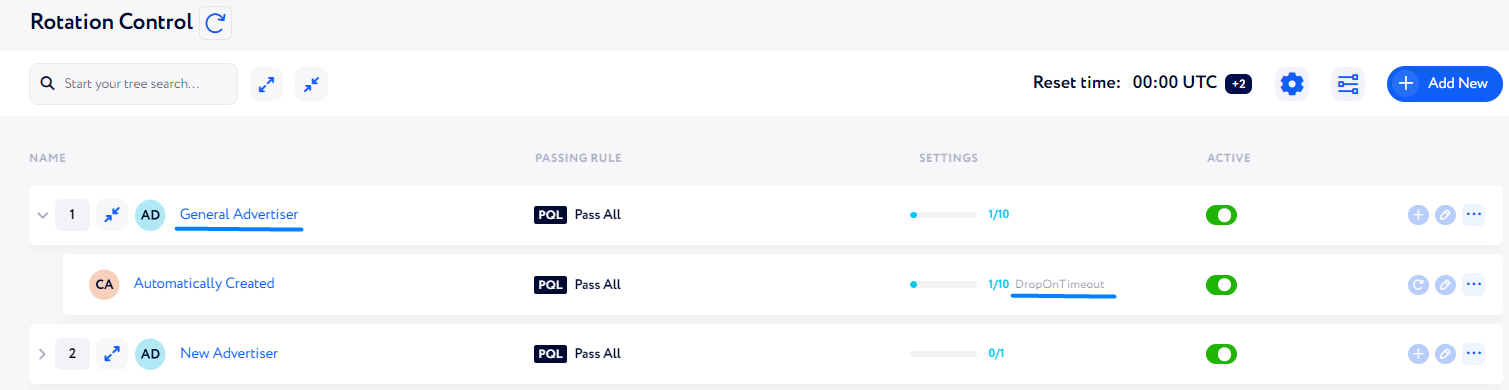
Drop On Timeout – if a lead is rejected with a timeout error by the advertiser of this lead capacity, such a lead will not try to be pushed to the next advertisers.
For example, a lead was rejected by the General Advertiser with the timeout error. It means that the lead will not be trying to be pushed to any other advertiser down on the page.
Skip On Reject – if a lead is rejected by any advertiser higher up on the page, such a lead will skip the given advertiser and will try to be pushed to ones located down on the page.
For example, if a lead was rejected by the New Advertiser, it will skip the Main Advertiser as "Skip On Reject" is set for it, and the lead was already rejected by an advertiser higher up on the page.
Pushed Lead Capacity – set a number of leads the advertiser can get per day. If the set number is achieved, the following leads will not be pushed to such an advertiser until the capacity is reset.
Rejected Lead Capacity (optional) – set the number of leads (or % of rejects out of pushed leads) this advertiser can reject.
If the number is achieved, incoming leads will not be pushed to such an advertiser until the capacity is reset.Rejections In a Row (optional) – set a number of leads an advertiser can reject in a row. If the number is achieved, leads will not be pushed to this advertiser until the capacity is reset.
Capacity Reset Time (optional) – set at least one point of time during the day when the lead number should be reset.
Note: As this time is set in UTC, mind the time zone distinction if your time zone differs from UTC + 00:00.Description (optional) – put a brief cap description if needed.
Here is an example of the complete configuration:
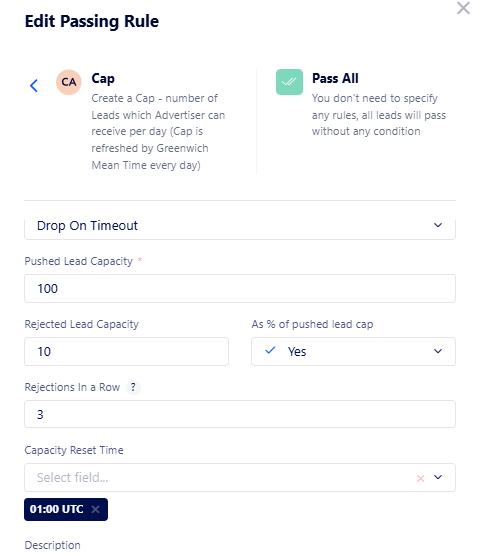
This rule says that if any lead is rejected by this capacity advertiser with a timeout error, such a lead will not be pushed to any other advertiser down the page (as "Drop on Timeout" is selected).
Also, the maximum amount of leads that can be pushed to this advertiser a day is 100 (as 100 is set for "Pushed Lead Capacity"), if afterwards a matching lead appears, it will skip this advertiser.
Additionally, the maximum amount of leads the advertiser can reject per day is 10 (as 10% is set for "Rejected Lead Capacity" and 10% out of 100 pushed lead capacity is 10). If the advertiser has already rejected 10 leads, no leads will be trying to be pushed to it.
Besides, the advertiser can only reject 3 leads in a row (as 3 is set for "Rejections In a Row"). If the advertiser has already rejected 3 leads one after the other, no leads will be trying to be pushed to it.
Finally, all the settings described will be reset at 01:00 UTC. Then, the advertiser can again receive 100 leads, reject 10 leads and reject 3 leads one by one.
Once you have configured the fields, click the "Submit" button to apply the changes.