How to create a goal?
Here, you can learn in detail about creating a new goal.
There are three options to create a goal:
In the advertiser creating window.
On a certain advertiser page, the Goals section.
In Settings Navigation → Goals.
It is more convenient to use the first or second option if you need to create a goal for a particular advertiser. If you wish to assign several advertisers for one goal, you can consider using the third option.
Although there are three approaches to create a goal, both of them have the same settings. Let us describe them as well as the procedure in particular.
Once you have decided on an option, you need to click the + button either next to the Advertiser page title (creating a goal together with a new advertiser), Goal Info title (via advertiser page), or next to Goals (via Settings Navigation).
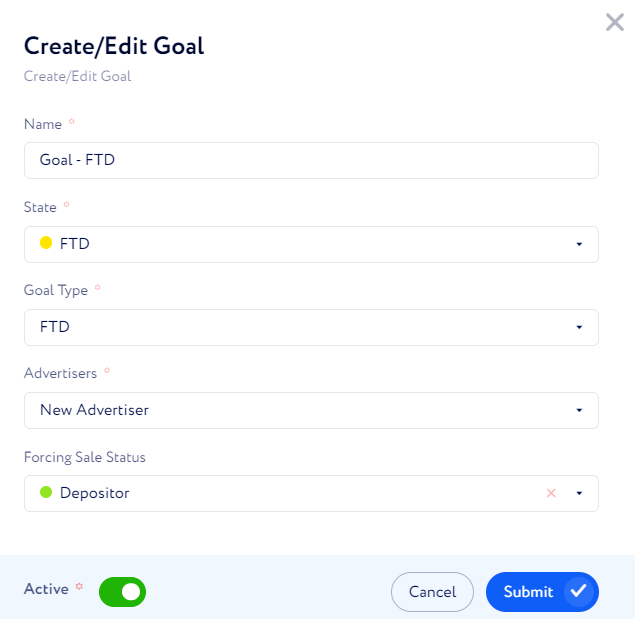
Then, the modal window appears where you should fill in the following data:
Name – set the name for this goal.
State – select a lead state out of ones you set in lead flow as the targeted action.
Goal Type – set a conversion type you want to target.
Advertisers – choose advertisers the goal to be applied for. This field is only applicable when creating a goal via Settings Navigation.
Forcing Sale Status – assign a sale status which will be automatically assigned to a lead once they have reached the set goal type.
Once you have clicked "Submit", the newly-created goal appears in the table.
You can monitor a particular goal performance by various criteria such as goal type, advertiser, conversion date, etc. in Lead Conversions → Conversions.
Also, there is an option to create a detailed report on conversion and download it in the CSV format in Reports → Data Exporter → Conversions Report.
If you need to take a quick look at the conversion figures, go to Reports → Drilldown Reports and set groups and conditions according to the information you would like to be displayed in the resulting report.
You can also generate a report on conversions that will be regularly sent to your Telegram account via Reports → Scheduled Reports.


