How to create an Offer?
There are three ways to do it:
Complete the Offer Wizard. A thorough configuration of an offer. It ensures all required elements will be configured and provides all possible optional settings as well.
Finish only the 1st step of the Offer Wizard. This is faster than going through all the steps. The downside is that the required fields with missing information won’t be highlighted, but you would still need to configure it.
Duplicate an existing offer. This is the simplest way, but it requires at least one offer to be ready.
Offer Wizard
This tool is designed to help you create an offer by displaying all of its main and secondary settings.
Requirements
To complete the Offer Wizard, you need:
At least one configured advertiser.
Goal Type.
Traffic Domain.
Step 1. General Settings
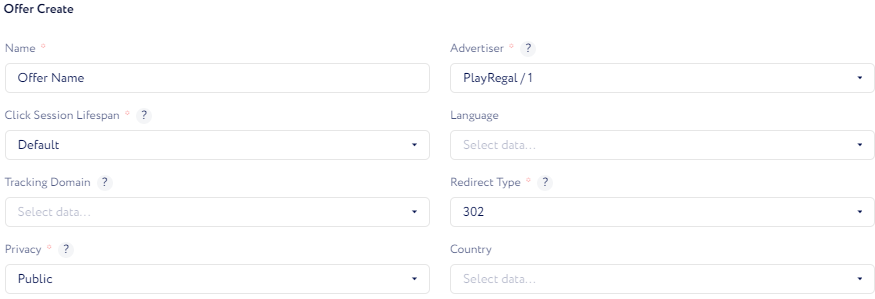
Required settings
Name You and affiliates will be able to find this offer by it.
Tracking Domain
A link that keeps the advertised page safe, and measures ad effectiveness.
If Tracking Domain is not filled - offer links will use Default tracking domain that can be found in Settings>Tracking Domains.
Privacy
Choose an affiliate access strategy:
Public– all affiliates can view and promote the offer.
Private – restrict access for all affiliates.
Request Only – let interested affiliates send requests before gaining full access to the offer.
If you’ve chosen either Public or Private, you can later—on the fourth step of the Offer Wizard – pinpoint the affiliates who are allowed or denied from viewing the offer.
Advertiser
This advertiser wil be linked to the offer.
Redirect Type
In general, When a lead clicks a tracking link, he gets redirected to an advertised page with response code 302.
302 – lead gets redirected straight to an advertised page. That’s the default option.
Meta Refresh – lead gets redirected to an empty page, then to an advertised page.
Double Meta Refresh – lead gets redirected to two empty pages, then to an advertised page.
Language(optional):
Tag the languages that are used in the offer. Offers can be sorted by this tag.
Country(optional):
Tag countries that you want to get leads from. Offers can be sorted by this tag.
Note:The Country field is merely a tag. To restrict traffic to specific lead countries, use Targeting.
Additionally, you can allow traffic from all countries, but differentiate payouts based on leads’ geolocation via Payout Settings.
Additional Settings
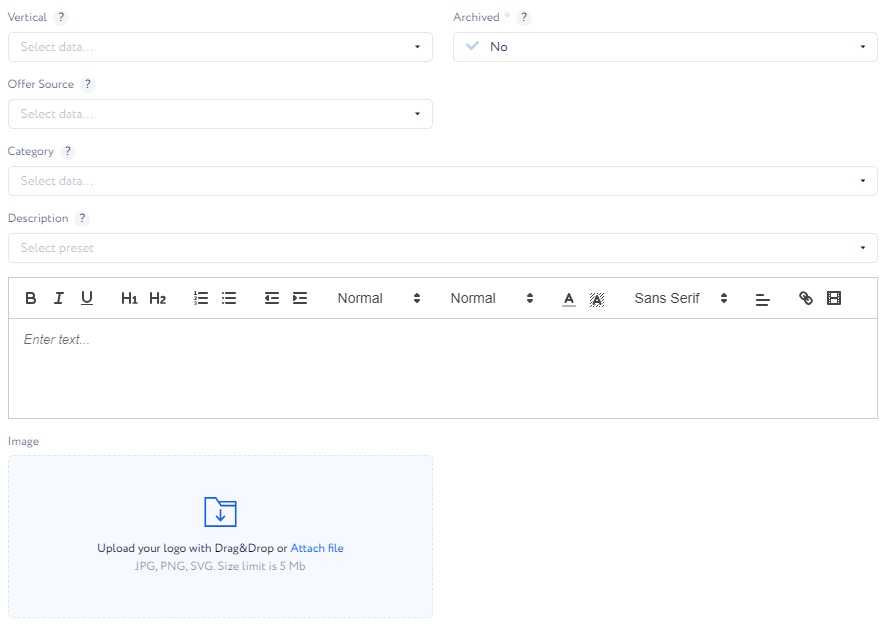
Vertical
This is a tag that makes it easier to sort offers by business sphere.
Offer Source
A custom tag for offers.
You can edit the list of tags in Settings Navigation>CRM Settings>Offer Source.
Archived
All archived offers are kept in a separate tab in Offers page. Affiliates see them.
Note:Offer archivation doesn’t turn it off.
Category
Add a custom tag to an offer.
Change the list of available categories in Settings Navigation>CRM settings>Category.
Description
This tool helps to type, paste and edit text descriptions for affiliates.
Description presets save texts and allow you to add them to various offers in one click. To add a preset, go to Settings Navigation>Presets>Offer Presets.
Image
Upload an image to make the offer stand out, affiliates will definitely see it.
Step 2. Goals
Goals distinguish lead actions available in this offer and optionally set unique payout settings for each of them.
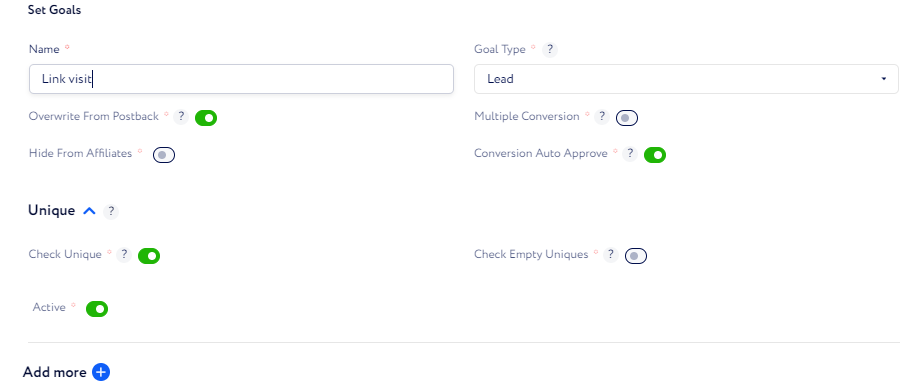
Name
Give a name for a specific goal only for this offer.
Goal Type
Conversions will be created, when leads complete this action.
Overwrite from Postback
Enable parameters of postback URLs to change Revenue and Payout values.
These URL parameters will have a higher priority than the rules in the Payout and Revenue tabs in the Main Tree, and will be applied to conversions for this goal.
Multiple Conversion
When it’s turned off, only one conversion can be generated for each goal.
Conversion Auto Approve
Turn it off to approve each conversion manually.
Active
Enable the goal.
Unique
Unique is a URL parameter that holds unrepeatable IDs. Use it to allow only one conversion with the same unique ID.
Check Unique
If multiple conversions are sent with the identical value of a unique parameter, only the first conversion gets recorded.
Check Empty Uniques
When it’s turned on, only one conversion with an empty value of the unique parameter can be created.
tep 3. URLs
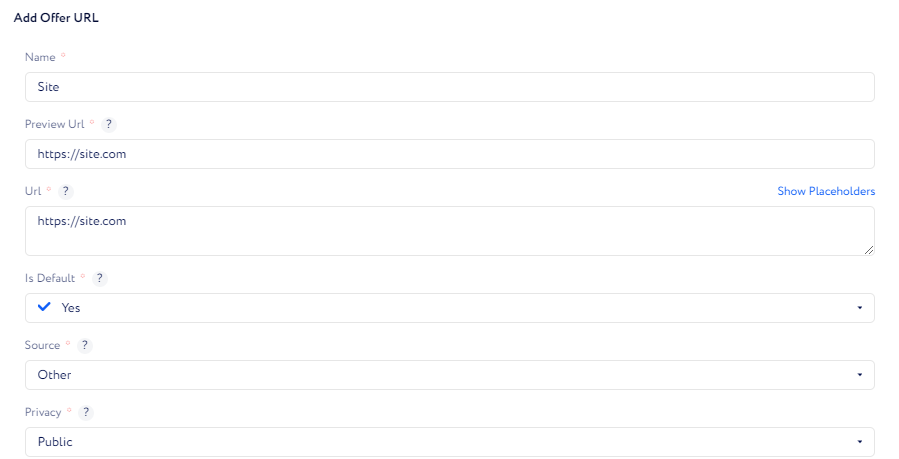
Preview URL
Enter a short link to display in tables across the CRM.
URL
Leads will be redirected to this page.
Is Default
Leads get redirected to this URL, if other URLs are not mentioned in parameters of the tracking link.
Source
Select LD source, if the Offer URL is a link to a funnel created in the Lead Distribution. Lead information will be pulled from the LD platform.
Privacy
Hide the URL from affiliates.
Add Free Parameters
There are two types:
Free Parameter
Advertiser Parameter
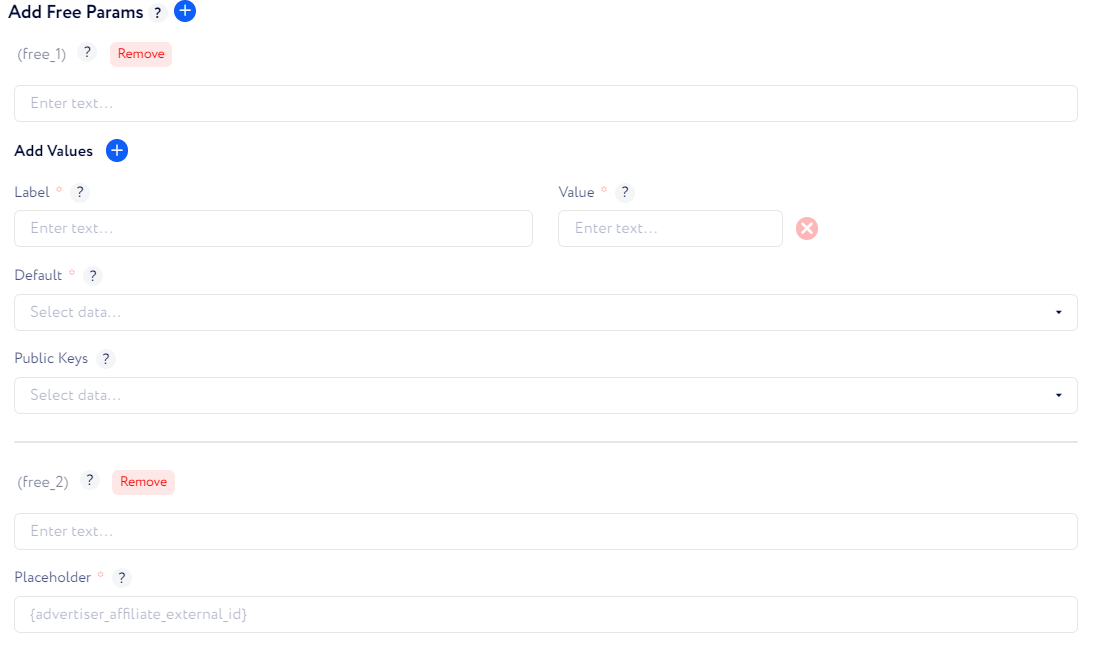
Free Parameter is a way to customize URLs by substituting the {free_x} placeholder from the URL with the contents of the Value field.
The placeholder should be manually added to the URL.
Label
This label is shown in Tracking Link Generator and in Affiliate Area.
Value
Substitutes the placeholder of the related free parameter {free_x} in the URL, when a lead clicks the link.
Default
Used as a default option, shown to affiliates.
Public Keys
Hide values from all affiliates. Then you can give access to it for selected affiliates in Affiliate>Free Parameters.
Advertiser Parameter substitutes the {free_x} placeholder in the URL with an External ID from Affiliate>Free Parameters>Advertiser Conditions.
Requires an advertiser integration and advertiser conditions.
Placeholder
To function properly, it must take only {advertiser_affiliate_external_id}.
Step 4. Affiliate Privacy
Give access individually to specific affiliates. It functions together with the privacy settings from the first step of the Offer Wizard. So if you’ve chosen the Public setting and allowed all affiliates, duplicating information in the Allowed list is unnecessary.
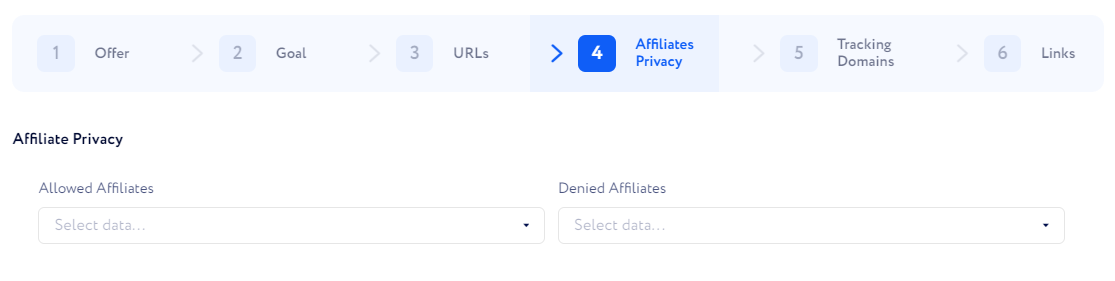
Allowed Affiliates
Add affiliates who can access the offer.
Denied Affiliates
Add affiliates who can’t view the offer.
Step 5. Tracking Domains
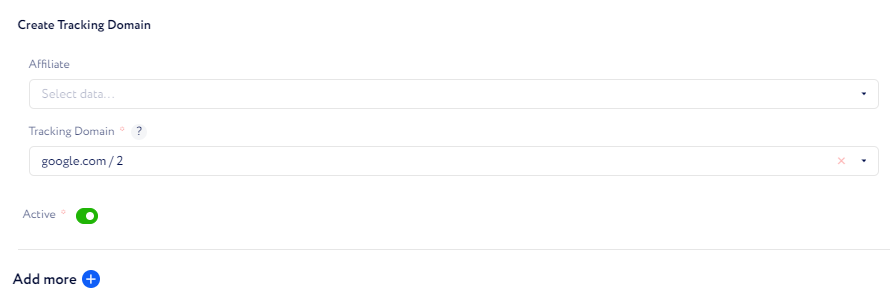
Affiliate
If needed, you can specify which affiliate this tracking domain should be applied to.
Tracking Domain
A link that keeps the advertised page safe, and measures ad effectiveness.
Step 6. Tracking Links
Here you can instantly customize tracking and conversion links and share them if needed. You can return to these links later via Dashboard>Tracking Link Generator and Offer>Conversion/Pixel Postback.
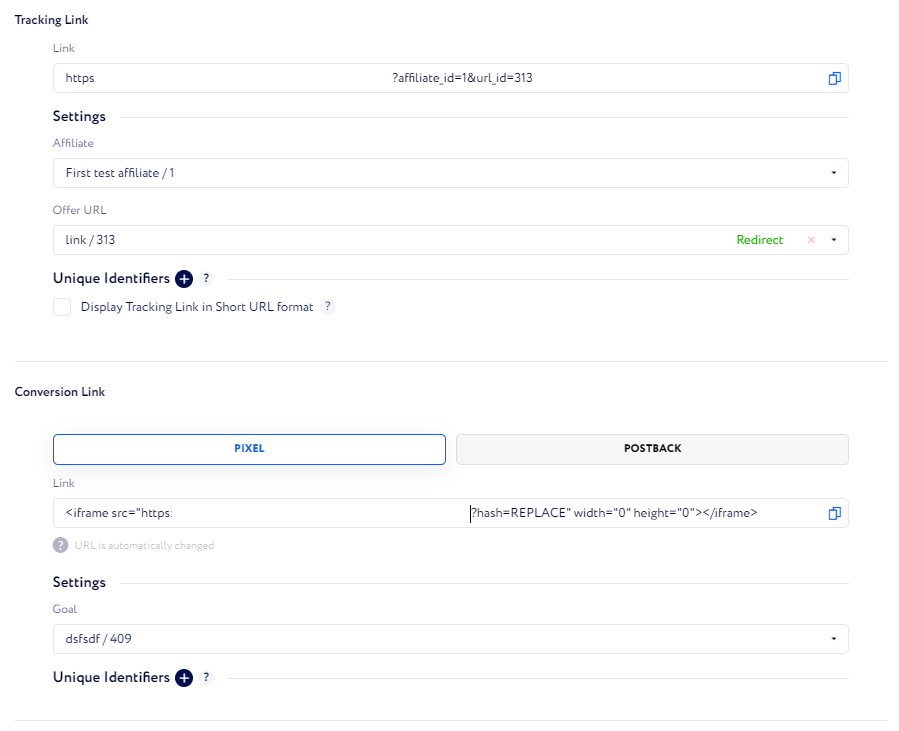
Tracking Link
When a lead clicks it, he gets redirected to the page he originally intended to visit and the click gets recorded in the CRM. Affiliates place those links on their resources and endorse them.
Affiliate
All clicks made via this link get registered for this affiliate.
Offer
Choose the related offer.
Unique Identifiers
This data will be recorded along with the click.
Conversion Link
The link should be fired when a lead makes an action which is considered a conversion.
Finish only the 1st step of the Offer Wizard
When you know exactly what you want to configure for the offer or you want to finish it later, you can complete only the first step of the Offer Wizard and click Submit. Then, on the second or any other step, close the Offer Wizard. You will find the offer in the Offer table.
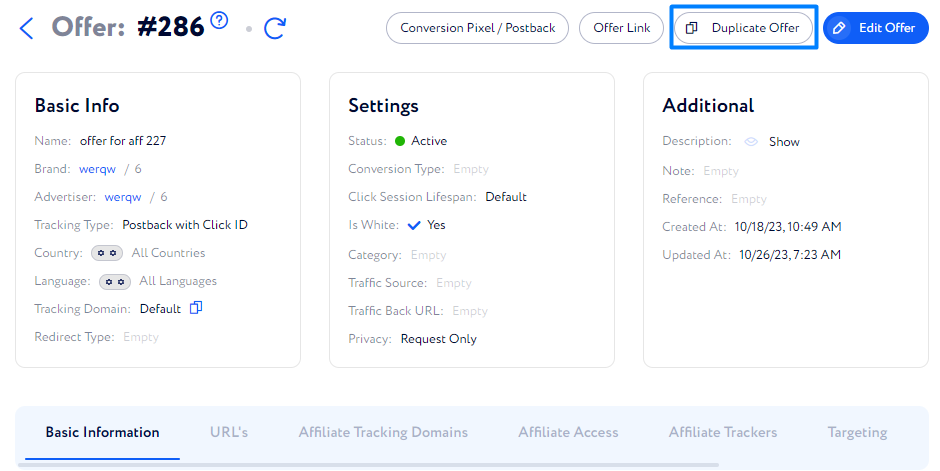
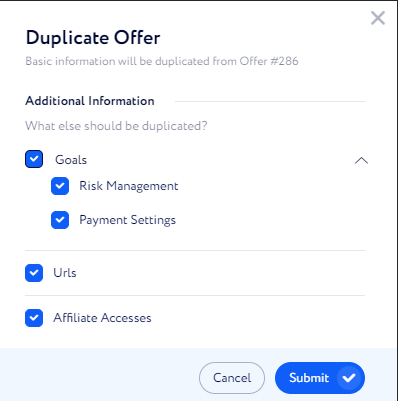
Duplicate an Existing Offer
Duplication allows you to copy an offer and, optionally, modify it later.
To do it, follow these steps:
Go to Offers>Offer page.
Click “Duplicate Offer“.
Select whether you also want to duplicate additional info.
Click Submit.